KineBody Pro

Movable 3D Human Model


KineBody Pro Instructions:

(last updated 221206)

Pose Tracing


Overview

With a KineBody Pro AnimTools subscription, you can create realistic poses more quickly, thanks to ‘Pose Tracing’ features, which enable you to:

While doing this, you still get to use all of KineBody Pro’s other special capabilities: identify bones, move them, hide them, etc. With 6 body degrees of freedom and 172 joint degrees of freedom, you can fit any realistic pose.

Caveat: there’s no magic involved here – a 2D image does not present ‘depth’ information well, and KineBody Pro cannot correct this problem. When tracing a pose, you may have to infer the depth of various body points, from experience, or image details such as perspective, lighting, shadows, etc. Nevertheless, KineBody Pro can help, thanks to its realistic ranges of motion for joints, you’re less likely to pose a joint incorrectly.

As a further benefit, the pose tracing tools can be used for other purposes. For example, if you select a transparent background and then save the skeleton as an image, you can export that image to a different graphics application, where you can show it interacting with photographic backgrounds or other graphic elements. Or, you can choose to render in line art (comic) style, with contrasting interior and outline colors, to create comic art, coloring books, etc.


Instructions

Following is a step by step procedure, to trace a pose using KineBody Pro. The procedure is presented twice: first as a summary, and then in detail. (Note that the tools for tracing a pose can be used for other applications as well; these are described later under ‘Related Tasks’).

Summary
  1. Open the Show subpanel, if necessary.
  2. Select ‘Transparent background’.
  3. Press the [Insert image] button, and select an image file.
  4. [Optional] Move or resize the background image.
    1. Click the Move checkbox.
    2. To move the image: Hold the Shift key, while dragging the image.
    3. To resize the image: Hold the Alt & Shift keys, while dragging the image.
    4. Uncheck the Move checkbox when you’re done.
  5. [Optional] Use transparent outlines
    1. Select Comic style
    2. Select Transparent body
    3. Click Outline color, and choose a color for high contrast.
  6. Position the skeleton to match the image pose.
  7. Save your pose: optionally edit the pose name, then press the [Save Pose] button.
Details
  1. Open the Show subpanel if not already open, by clicking on its titlebar.


  2. Select ‘Transparent background’, so that the image will show through when you load it. Before an image is loaded, the transparent background will appear white.


    Initial view

    Transparent background

    Background image inserted

  3. ( Background photo credit: Capoeira Enschede aan Zee by archangel 12, on Flickr   Creative Commons Creative Commons Attribution 2.0 Generic License )  

  4. Click the [Insert Image] button. A window titled ‘Open’ will appear, allowing you to select an image file from your local disk.


    You can insert any of the conventional web-compatible image types, including .bmp, .gif, .jpg, and .png.

    Note however, that you can’t load an image directly from the internet - if you wish to use such an image, download it first to your local disk before loading it into KineBody Pro.

    Your selected image will appear behind the KineBody skeleton, fitted to the size of the viewing area, and centered.

    The ‘Show’ checkbox, to the right of the insert button, will be automatically checked whenever you open a new image. You can optionally uncheck this box if you ever wish to hide the background image.

    (Note that the Undo, Redo, UndoAll, and RedoAll buttons do not apply to the operations in the Show subpanel. If you make a mistake, correct it by just manually un-doing the operations described above.)

    (Note that the background image will NOT be included when you save an image using KineBody Pro, as described below, nor will it be included when you save an image. If you want to keep track of the name of the background image you used to create your pose, you may wish to reference it in the pose name; otherwise, record it in an external notes file).

  5. [Optional] Move or resize the background image. When you import a background image, it will be automatically fit into the area behind the skeleton. You can resize &/or move the image, as follows:

    1. Check the Move checkbox (in the Show subpanel); this allows you to change the image size & position by dragging.

      (The Move checkbox changes the normal dragging behavior: normally, when you drag across the viewing area, you move the skeleton. When the Move checkbox is checked, these same actions move the image, instead. You should uncheck the Move checkbox when you’re done moving the image, to reinstate the regular dragging effects).

    2. To move the image, hold the [Shift] key down & drag across the viewing area. You can position the image horizontally and or vertically as you wish.

    3. To enlarge or reduce the image, hold the [Alt] & [Shift] keys down, while dragging across the viewing area.

      (Note that moving to the right or upward causes the image to shrink: this is intentional, to match the effect of changing the skeleton distance, when dragging normally (without the ‘Move’ box checked)).

      It's advisable to make the posed figure in the image as large as possible, to fit within the viewing area. This will make it easier to fit the skeleton because you can pinpoint the joint centers and discern depth cues more readily. Also, if you’re rendering the skeleton as a transparent outline, the lines will be more pronounced and thus easier to fit.

    4. Repeat (b) and (c) as necessary to position your image.

    5. When you’re satisfied with the image position, uncheck the Move checkbox; this will allow you to use the [Shift] and [Alt][Shift] buttons in their regular mode, i.e., to position the skeleton.

    Note that the image can only be moved or resized by dragging across the viewing area, as described above. There are no sliders to do these operations.

  6. [Optional] Use transparent outlines

    When you follow the steps above, you should see the KineBody skeleton in front of your background image, rendered using KineBody Pro’s conventional ‘illuminated 3D’ mode. This skeleton ‘style’ may be adequate for matching the bone positions to your image, but you may find it easier if you change the skeleton appearance, to depict the bones using transparent outlines instead.

    To show the bones as transparent outlines:

    1. Choose ‘Comic style rendering’ to show the skeleton using a line art style. When you first select this option, the skeleton is rendered in two contrasting opaque colors.

    2. Choose ‘Transparent body’ to remove the colored interior of the skeleton.

      Note that this checkbox doesn’t do anything useful unless you’re using comic-style rendering.

    3. Click the ‘Outline color‘ box, to select a line color that contrasts sharply with your background image. When you do this, a conventional color selection panel will appear, allowing you to select a standard or custom color.

      Color selection panel

      You may find it useful to change these options while you work: change the line color as necessary to contrast with portions of your image, or revert to ‘illuminated 3D’ mode (by unchecking Comic Style), if the lines aren't sufficiently thick.

      Note that these changes cannot be reverted using the Undo or Redo controls.


    Comic style

    Transparent body

    Alternate outline color

  7. Position the skeleton to match the underlying image pose. There is no hard & fast procedure to do this; a good amount of trial and error will typically be necessary. Nevertheless, here are some recommendations, regarding positioning the skeleton:

    1. Start by positioning the ribcage (thorax), and work outward from there. It's worthwhile to take some time to position the thorax accurately, because it’s the ‘base’ for all other bones, i.e., all of the other bone and joint positions depend on it.

      However, this approach won't work for all situations – you may have to position some distal bone before you can finalize the position of its proximal neighbor.

      For example, as you work outward from the thorax to fit an arm, you would first fit the clavicle, then the scapula, then the humerus, then the ulna, etc. At the shoulder (gleno-humeral) joint, you can easily adjust 2 of the upper arm angles (flexion/extension and abduction/adduction) by matching the elbow location. However, you may find it difficult to fit the 3rd shoulder angle (internal/external rotation), because that angle doesn’t affect the elbow position. Instead, you may need to skip ahead, to (roughly) fit the forearm by adjusting the flexion angle at the elbow (humero-ulnar) joint. This will help you assess the amount of internal/external rotation to apply at the shoulder. Generally, you may have to iterate the positions for the shoulder and elbow joints to obtain a satisfactory fit for the wrist position.

    2. Take into account the amount of flesh (muscle, fat, and skin) on top the bones, as you position them above your image figure. In particular, it's helpful to understand where the flesh is thin, to allow quick & accurate positioning. For example, if you’re fitting the skeleton to a lateral view of the body, the tibia (shin bone) is located very close to the front edge of the calf.

      You can often use your own body to find other locations where the flesh is thin. Or, consult an online anatomy reference, especially one that shows cross-sectional views. For example: http://www.lumen.luc.edu/lumen/meded/grossanatomy/x_sec/mainx_sec.htm.

      Of course, this all presumes you can see or discern the relevant body surface features in your image. This will be easiest if your posed figure is wearing minimal or tight clothing.

    3. Understand & handle biomechanical constraints. Occasionally, you may come across a pose that you can't match, because you encounter an ROM (range of motion) limit for one of the joints. There are a couple of reasons this may happen, and different solutions:

      i) The posed figure in your image may be more flexible than the KineBody skeleton, whose ROM limits are averages for a population of test subjects. In this case, you can disable the joint range limits (via the Unlimited ROM checkbox) and move the joint to match your image. Remember to re-enable the limits when you're done, because otherwise you might introduce a lot of unrealistic angles you didn't intend !

      ii) The posed figure isn't necessarily more flexible than average – instead, you’re constrained by a joint angle you selected closer to the thorax. Perhaps the best example is when you try to lift the skeleton’s upper arm straight upward, and you can't, because you run into the flexion limit (at 110°).

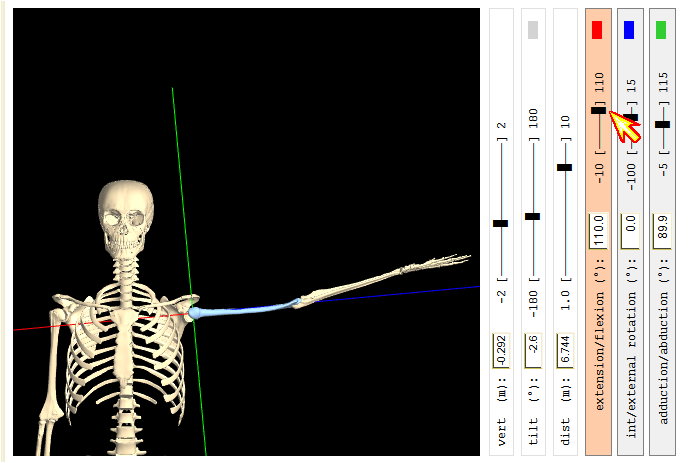
      ROM Limit @ 110 flexion

      Although you could disable this limit, you shouldn’t, because this is a real biomechanical constraint. Instead, you may need to elevate the clavicle, at the sterno-clavicular joint. If you elevate it close to its limit (45° elevation), the upper arm will be directed more vertically upward. (And if that’s not enough, try adjusting the abduction/adduction angle…)


      Elevated sternoclavicular joint

      Note that in this case, the joint range limits are actually beneficial, because they force you to position the bones realistically.

      This approach may work in other situations as well. The general idea is that, if you reach a point where you can't fit the skeleton to the image pose, try returning to one of the more proximal joints and make some changes. As with other aspects of pose tracing, expect that some iteration will be necessary.

    4. Tolerate imperfection. You typically won't be able to fit the skeleton perfectly to the figure in your image, for several reasons:

      • Uncertain pose: If your posed subject is wearing baggy clothing, or tends to be plump, it may be difficult to discern the correct locations for the bones.

      • Obscured details: If your image shows a figure posed with some body part(s) obscured by other parts (or by objects or other figures in the image), it may be difficult or impossible to match the pose of the obscured parts.

      • Ambiguous depth in 2D images: There’s an inherent difficulty fitting a 3D pose to a 2D image, in that the depth (i.e., distance along the viewing direction, from near to far) of various body parts may be difficult to discern.

        If you photograph the pose yourself, you can alleviate some of this difficulty by shooting the same pose from different angles, e.g. 90° apart, and using them successively to fit the skeleton.

        If you can't use multiple angle shots, you may be able to guess the depths reasonably well from experience: for a runner viewed from the side, you can presume that the motion paths for the feet lie laterally within a few inches of each other. Otherwise, your only recourse is to use visual cues such as perspective, lighting and shadows, to estimate the depths.

      • Body proportions: The skeleton used in KineBody Pro represents one particular body size, shape, and gender, so it may not fit ideally for other body types.

      • Complexity of the skeleton: The KineBody Pro skeleton comes with a large number of degrees of freedom (172 for joints, plus 6 for the body overall). Although you can adjust any of these at any time, you may find it useful, as a practical matter, to prioritize & limit your effort to the most important joints.


    Bones positioned to match

    Final result

  8. Save your pose: although your pose will be saved temporarily using KineBody Pro’s auto-save feature, it’s better to save it as a named pose, so it will be available whenever you want it. For further details, see here.


Related Tasks

This section provides overviews and instructions for using the pose tracing tools for other tasks (besides pose tracing).

Use a Transparent background

The black background behind the KineBody skeleton can be removed in KineBody Pro, independently of any other operations. You may find this useful if you want to export a posed skeleton to some other graphics application, where you can show it interacting with some sort of environment, some objects, or other figures. For example, you could use this approach to combine multiple KineBody skeletons into a single image. (Note that for exported skeletons, the body and joints will no longer be movable).

To make the background transparent:

  1. Select ‘Transparent background’, in the Show subpanel.
If you haven't loaded a background image, the background will show as plain white.

If you now save the image as a png file (via the ‘Save Image’ button in the Save subpanel), the saved image will have a transparent background as well. You can then export the png image into a different graphics application.

Note: When saving an image with a transparent background, you don’t actually discard the background – it’s still there, in the form of a rectangular region of transparent pixels, as large as the original black background. These ‘extraneous’ pixels shouldn’t cause any difficulty, but if you want to minimize their effect (e.g. on image file size), try reducing the size of your browser window: this will correspondingly reduce the KineBody Pro viewing area and hence the amount of background content (without changing the skeleton size!)

Use a background image

You can import an image in any conventional web image format (jpg, gif, png, bmp) to show behind the KineBody skeleton. This capability is primarily intended to allow you to trace a pose, as described above. However, you can also import a background image as a way to show the KineBody skeleton interacting with objects, figures, or an environment, and at the same time to retain all of KineBody Pro’s special capabilities (to move the body and/or joints in 3D, identify or hide bones, etc.)

To import a background image:

  1. Open the Show subpanel, if necessary.
  2. Select ‘Transparent background’.
  3. Press the [Insert image] button, and select an image file.
  4. [Optional] Move or resize the background image.
    1. Click the Move checkbox.
    2. To move the image: Hold the Shift key, while dragging the image.
    3. To resize the image: Hold the Alt & Shift keys, while dragging the image.
    4. Uncheck the Move checkbox when you’re done.
For additional details, see Steps 1-3 in the Pose Tracing section.

Render the KineBody skeleton using ‘Comic style’

KineBody Pro offers the option to draw skeleton bones using outlines, instead of illuminated 3D graphics. This ‘comic style rendering’ has been introduced to simplify tracing a pose, as it allows you to see image details that would be otherwise obscured. However, this capability can also be used independently of pose tracing, to generate comics, coloring books, or cartoons, for entertainment, education, or whatever else you can dream up!

When you show the bones using comic style, you can still use all of the regular KineBody Pro tools, to move the body or joints, to identify or hide bones, etc.

To use comic style rendering:

  1. Check ‘Comic style rendering’ to show the skeleton using a line art style. When you first select this option, the skeleton is initially rendered in two contrasting opaque colors.

  2. Select colors for the outline and interior by clicking on the colored boxes (labeled ‘Outline’ and ‘Interior’) When you click on either of these boxes, a conventional color selection panel will appear, allowing you to select a standard or custom color.

Some options:

As a shortcut, you can obtain a white interior by clicking the ‘Transparent body’ checkbox, which removes the colored interior of the skeleton. Likewise, select ‘Transparent background’ to show the background as white.

You can show the bones as colored silhouettes, by selecting identical colors for the outline and interior. (If this doesn’t seem to work, check that the ‘Transparent body’ is unchecked !)